Troop 226
Knot Master Program
Knots are a skill taught at every level of scouting. The “Knot Master” program is designed to provide each scout an opportunity to learn essential knots. In addition to learning the knots, each scout will wear a five foot piece of rope on a carabiner with the color of rope designating their current level of proficiency.
After completing Level One, the scout is awarded a green rope with a carabiner and will use special method for tying the five-foot piece of rope to the carabiner (the ‘carrying’ knot). This now allows the scout to carry the rope at all scout functions, and displays his success in completing Level One. In addition, it provides one more element of “Be Prepared,” for there are countless uses for a five-foot piece of rope.
From here the scout can continue to progress through the other three levels of the program. Upon completion of each level the scout is awarded with a different color of rope: blue, red, and finally black. Upon obtaining the coveted black rope, the scout is declared a “Knot Master.”
Level 1: Green
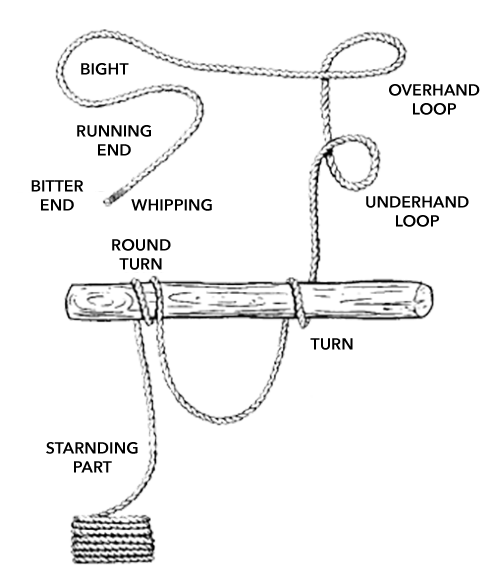
Bight, Loop, Turn, and Tuck
Knots are formed by using techniques called bight, loop, turn, and tuck. If you remember these terms and how to perform them, you can tie even the most complex knot.
- The bight is formed by laying the end of the rope against the standing part, or long end.
- Loops, overhand or underhand, are just what their names say.
- A turn is wrapping the rope around something, and a tuck is inserting the running end or a bight into a loop.
Definitions
Bend: Secures two rope ends to each other
Bight: Curved part no smaller than a semicircle
Cord: Several threads twisted together
Frap: To bind or wrap tightly
Hitch: Used to make a rope fast to another object
Lashing: Secures one object to another with rope
Rope: Several strands twisted together
Spar: Rigid Pole
Standing Part: Inactive section of the rope
Strand: Two or more large yarns twisted together laid up right-handed into rope
String: The same as thread using larger yarns
Thread: Two or more yarns twisted together
Working End: Part of the rope being manipulated
Yarn: Fibers twisted together
Caring for Rope
A good rope is expensive and should not be handled carelessly. Keep it clean and free of mud or grease. If it is damp, do not coil or store it until it is thoroughly dried out. Always keep it in a dry place. Rope should never be thrown into a comer to tangle and kink. When a job is finished, the rope should be placed where it will be available instantly, if necessary, and should be coiled so that it will lay out smoothly when needed.
Coiling Rope
To coil rope, first shake it out in a straight line so there will be no kinks. Hold the end with one hand, and with your other hand pull in enough rope to make an 18-inchloop. As you place the loop in your hand, roll the rope ahalf-turn with your thumb and forefinger. This will counteract the twist you put in the rope as you made the loop and will help to eliminate kinks.
To make a tight coil, lay the outer circle first and coil in toward the center in a clockwise direction. Give a half-turn to each coil to eliminate kinks. If your coil is too loose, you can tighten it by twisting the center with the palm of your hand.